A coloured mineral finish with a defined method
Monocouche Rendering Chester | Colour, Grain and Wall Readiness
Monocouche is often chosen for its coloured mineral appearance and textured finish. Its name does not remove the need for preparation, detailing or a planned application sequence. A Chester project should specify the product and its intended use on the actual background, with a sample that demonstrates the finished grain. The following points help distinguish a complete proposal from one that names a material but leaves the work supporting it uncertain.

On this page
Understand what the finish will look like
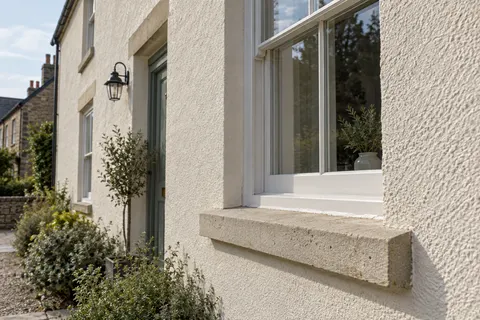
A scraped mineral finish has a surface character that differs from a thin decorative coating. Grain, colour and the application method all contribute to the result. The intended appearance should be demonstrated on a representative sample rather than inferred from a bag label or a small colour chip. View it beside retained masonry and window frames, and consider the scale of the elevation. A texture that looks subtle on a sample can become a stronger part of the design across a large uninterrupted face.
- Background Usually blockwork or brick; uneven or mixed walls may need a levelling coat.
- Beads and mesh Beads at corners, reveals and the base; mesh over junctions and lintels.
- Monocouche passes One through-coloured material, applied in passes to the specified thickness.
- Scraped surface Scraped once partly set, which removes the skin and leaves the texture.
Wall on the left, finish on the right. Not to scale: coats, thicknesses and primers follow the chosen manufacturer’s system and the condition of the wall.
Confirm that the background is suitable
Bare masonry is not one uniform category. Different blocks, mixed materials and previous alterations can affect preparation and the system design. The wall should be assessed against the selected manufacturer's requirements before application. Paint or an existing covering may prevent direct use of the proposed material unless the specified preparation resolves it. The quotation should identify those conditions explicitly. It is not enough to assume that a cement-based product will adhere to anything that looks solid from the ground.
On a refurbishment, removal may reveal an uneven or repaired background. The scope should allow for reviewing that condition before the render build-up proceeds. A pebbledash removal trial can provide useful early evidence, but it should be interpreted as a sample of the wall rather than proof of uniform conditions. If substantial defects are found, the repair or design decision comes first. Applying the finish promptly is not a substitute for making the supporting wall suitable.
| Subject | What the project needs |
|---|---|
| Substrate | An identified background suitable for the chosen product |
| Existing layers | A defined retention or removal decision |
| Junctions | Appropriate treatment of material changes and movement details |
| Openings | Resolved sills, reveals, heads and retained features |
| Access | A sequence that allows application and inspection of the intended panels |
| Appearance | An approved reference for colour and texture |
Make room for the finished thickness
The render face must relate correctly to sills, roof edges and other projections. If an existing feature was designed for a thinner covering, the new build-up may reduce its effective projection. The detail should be checked and any necessary alteration included in the scope. At the base of the wall, the termination needs to suit the construction and ground relationship. These are not small aesthetic extras: they influence how the surface meets the elements around it and how water is directed away.
For a property with decorative bands or surrounds, show what remains exposed and how the material ends beside it. A thick border added merely to make application easier can change the intended proportions. The appropriate solution may involve another trade or a different local specification. Our single-wall guide explains how to define those edges, and whole-house planning covers the same decisions across several elevations. The aim is a deliberate finished face rather than a product applied until it reaches whichever obstacle comes next.
Plan the work around the intended panels
The application sequence should follow the selected material's instructions and the design of the elevation. Natural breaks may help define working areas, but arbitrary stopping points across a prominent flat face can affect appearance. Access needs to support the whole operation and allow safe movement around the work. Other trades should complete the relevant associated work before the final finish, so new holes or altered fittings do not create unnecessary patches soon afterwards.
Weather and curing conditions also influence the programme. The contractor should have suitable protection and a realistic sequence for the specified product. A description such as one coat does not mean that every project is completed in one visit or that preparation can be omitted. The name refers to the type of system; the actual work still follows the manufacturer's method. The owner should receive a programme that explains the stages and dependencies without suggesting that exterior materials can be applied regardless of conditions.
Compare it with alternatives on equal terms
If silicone rendering is also being considered, compare complete specifications for the same wall. The alternatives may differ in texture, preparation, components and future care. A price comparison between a full replacement on one hand and a decorative treatment over retained material on the other says little about the products themselves. Establish a common scope before deciding which proposal suits the project. The preferred appearance remains important, but it should be judged alongside the background and the work required to support it.
Keep the finish information for later alterations
Future repairs can be affected by the texture and weathering of the original surface. A patch may be technically sound yet remain visible, particularly in the middle of a broad panel. Retain product and colour references and consult the relevant guidance before altering or decorating the wall. A later colour change needs a compatible treatment and suitable preparation; it should not be assumed that any masonry paint can be added without consideration of the existing system.
At completion, inspect defined panels and junctions against the agreed reference, then keep the relevant documents with the property information. Check the reinstatement of fittings and the removal of temporary protection. The Chester service overview links this option with the rest of the project. Monocouche can provide a clear, consistent material character, but the quality of the finished elevation depends on the decisions made before that character becomes visible.
Common questions
Does monocouche mean no preparation coat is ever required?
No. Preparation depends on the selected product and background. Some situations require additional treatment or a different system altogether. The manufacturer's specification for the actual substrate should govern the proposal rather than a literal interpretation of the name.
Can an old painted wall receive monocouche directly?
Do not assume that it can. Existing coatings and their adhesion need assessment, with the appropriate removal or preparation specified. A painted surface that appears intact may still be unsuitable for direct application of the proposed render.
See housing and planning information for Chester and nearby places, including the source and geography behind each figure.